
環境配置
wxPython: sourceforge項目頁https://sourceforge.net/projects/py2exe/files/py2exe/0.6.9/
下載后雙擊安裝即可,安裝程序會自動安裝到對應pythonScripts下。
py2exe:官方下載主頁https://www.wxpython.org/download.php
同樣雙擊即可安裝,注意下載要對應使用的Python版本。
下面分別示例說明wxPython和py2exe的簡單使用。
基本示例
文件名:wxTest.py:
# -*- coding: cp936 -*-
'''MainWindow類完成最簡單的編輯功能,添加一個主菜單,兩個子菜單(about和exit)'''
import wx

class MainWindow(wx.Frame):
 '''定義一個窗口類'''
 def __init__(self, parent, title):
 wx.Frame.__init__(self, parent, title=title, size=(300, 300))
 self.control = wx.TextCtrl(self, style=wx.TE_MULTILINE)

 self.setupMenuBar()
 self.Show(True)

 def setupMenuBar(self):
 self.CreateStatusBar()

 menubar = wx.MenuBar()
 menufile = wx.Menu()

 mnuabout = menufile.Append(wx.ID_ABOUT, '&About', 'about this shit')
 mnuexit = menufile.Append(wx.ID_EXIT, 'E&xit', 'end program')

 menubar.Append(menufile, '&File')

 #事件綁定
 self.Bind(wx.EVT_MENU, self.onAbout, mnuabout)
 self.Bind(wx.EVT_MENU, self.onExit, mnuexit)

 self.SetMenuBar(menubar)

 def onAbout(self, evt):
 '''點擊about的事件響應'''
 dlg = wx.MessageDialog(self, 'This app is a simple text editor', 'About my app', wx.OK)
 dlg.ShowModal()
 dlg.Destroy()

 def onExit(self, evt):
 '''點擊退出'''
 self.Close(True)
app = wx.App(False)
frame = MainWindow(None, 'Small Editor')
app.MainLoop() #循環監聽事件
編輯好改文件后,使用py2exe將Python腳本編譯成Windows可執行文件,這樣就不需要Python解釋器了。要使用py2exe,首先要編寫一個編譯腳本,然后通過Python運行編譯腳本即可將其他的腳本編譯成可執行文件。以下實例是將要編譯成可執行文件的腳本,文件名:setup.py
import distutils
import py2exe
distutils.core.setup(windows=['wxTest.py'])
在setup.py中除了導入必需的模塊以外,只有一條語句:
distutils.core.setup(windows=['wxTest.py'])
方括號中就是要編譯的腳本名,前邊的windows 表示將其編譯成GUI程序。如果要編譯命令行界面的可執行文件,只要將windows改為console,如果需要將腳本編譯成Windows服務,則可以使用service選項。
都編輯好之后,將wxTest.py和setup.py放在同一個路徑下,cmd進入該路徑,輸入:
setup.py py2exe
error: MSVCP90.dll: No such file or directory
ImportError: No module named sip
setup.py py2exe --includes sip
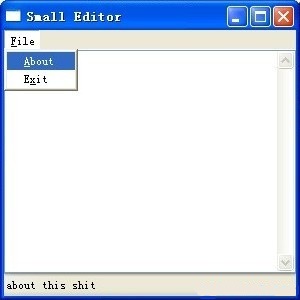
運行結束之后,會在路徑下生成dist和 build兩個目錄。其中dist目錄中就是編譯生成的文件。如果要在其他未安裝Python的機器上運行編譯好的程序,只要將dist目錄復制到其他機器上即可。雙擊運行wxTest.exe,如圖:
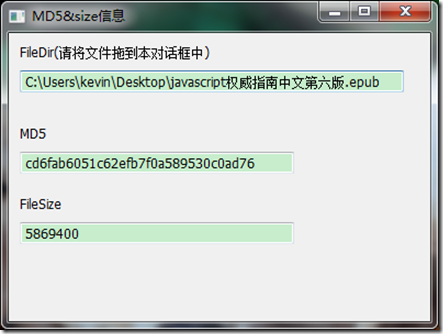
使用wxPython建立一個計算文件md5的GUI工具
小工具最終是下面這個樣子,將文件拖到上面會自動計算其md5與size
下面是全部的代碼
#coding:gbk
import wx
import optparse
import time,hashlib
import threading
import os

def checkMD5(pefile):
 try:
 f = open(pefile,'rb')
 data = f.read()
 m = hashlib.md5()
 m.update(data)
 f.close()
 return m.hexdigest()
 except:
 return 'error'

def getFileSize(filename):
 try:
 size = int(os.path.getsize(filename))
 return size
 except:
 return 'error'

#線程函數
class FuncThread(threading.Thread):
 def __init__(self, func, *params, **paramMap):
 threading.Thread.__init__(self)
 self.func = func
 self.params = params
 self.paramMap = paramMap
 self.rst = None
 self.finished = False

 def run(self):
 self.rst = self.func(*self.params, **self.paramMap)
 self.finished = True

 def getResult(self):
 return self.rst

 def isFinished(self):
 return self.finished

def doInThread(func, *params, **paramMap):
 t_setDaemon = None
 if 't_setDaemon' in paramMap:
 t_setDaemon = paramMap['t_setDaemon']
 del paramMap['t_setDaemon']
 ft = FuncThread(func, *params, **paramMap)
 if t_setDaemon != None:
 ft.setDaemon(t_setDaemon)
 ft.start()
 return ft

class FileDropTarget(wx.FileDropTarget):
 def __init__(self, filetext,md5tx,filesizetx):
 wx.FileDropTarget.__init__(self)
 self.filepath = filetext
 self.md5tx = md5tx
 self.filesizetx = filesizetx

 def OnDropFiles(self, x, y, fileNames):
 filename = fileNames[0].encode('gbk')
 print filename
 print type(filename)
 self.filepath.SetValue(filename)
 md5 = doInThread(checkMD5,filename)
 filesize = doInThread(getFileSize,filename)
 while True:
 if not md5.isFinished():
 time.sleep(0.5)
 else:
 self.md5tx.SetValue(md5.getResult())
 break

 while True:
 if not filesize.isFinished():
 time.sleep(0.5)
 else:
 self.filesizetx.SetValue(str(filesize.getResult()))
 break

class Frame(wx.Frame): #Frame 進行初始化
 def __init__(self,title):
 wx.Frame.__init__(self,None,title=title,size = (400,300))
 boxSizer = wx.BoxSizer(wx.VERTICAL)

 self.panel = wx.Panel(self)

 # boxSizer.Add(self.panel,1,wx.EXPAND|wx.ALL) #wx.ALL 周圍的距離,EXPAND擴充到全部

 filepath = wx.StaticText(self.panel,-1,"FileDir(請將文件拖到本對話框中)")
 filetext = wx.TextCtrl(self.panel,-1,"",size=(350,20))

 md5st = wx.StaticText(self.panel,-1,"MD5")
 md5tx = wx.TextCtrl(self.panel,-1,size=(250,20))

 filesizest = wx.StaticText(self.panel,-1,'FileSize')
 filesizetx = wx.TextCtrl(self.panel,-1,size=(250,20))

 # hashst = wx.StaticText(self.panel,-1,'Hash')
 # hashtx = wx.TextCtrl(self.panel,-1,size=(250,20))

 boxSizer.Add(filepath,0,wx.EXPAND|wx.LEFT|wx.TOP,border=10)
 boxSizer.Add(filetext,0,wx.LEFT|wx.TOP,border=10)
 boxSizer.Add((-1,20))
 boxSizer.Add(md5st,0,wx.LEFT|wx.TOP,border=10)
 boxSizer.Add(md5tx,0,wx.LEFT|wx.TOP,border=10)
 boxSizer.Add((-1,10))
 boxSizer.Add(filesizest,0,wx.LEFT|wx.TOP,border=10)
 boxSizer.Add(filesizetx,0,wx.LEFT|wx.TOP,border=10)
 # boxSizer.Add((-1,10))
 # boxSizer.Add(hashst,0,wx.LEFT|wx.TOP,border=10)
 # boxSizer.Add(hashtx,0,wx.LEFT|wx.TOP,border=10)

 dropTarget = FileDropTarget(filetext,md5tx,filesizetx)
 self.panel.SetDropTarget( dropTarget )

 self.panel.SetSizer(boxSizer)

class App(wx.App): ##繼承wx.App
 def OnInit(self): ##還沒有調起來的時候讀取初始化
 self.frame = Frame('MD5&size信息')
 self.frame.Centre()
 self.frame.Show(True)
 return True

def killSelf(evt = None):
 os.system('taskkill /F /T /PID %d >NUL 2>NUL' % win32process.GetCurrentProcessId())

if __name__ == '__main__':
 parser = optparse.OptionParser()
 parser.add_option('-x', '--no-update', dest = 'test', action = 'store_true', help = 'start without update')
 parser.add_option('-t', '--no-update-test', dest = 'test2', action = 'store_true', help = 'start without update debug')
 options, args = parser.parse_args()
 if options.test:
 print("-x param")
 if options.test2:
 print("-t param")
 App(redirect = False).MainLoop()
一點點的解釋:
class App與App().MainLoop()是固定寫法,在class App下有一個def OnInit方法來初始化主的Frame,將其居中并且Show()出來,沒什么好說的,主要看一下Frame的定義
這個小工具使用的是boxSizer來布局,為了簡單我只使用了一個boxSizer,將里面的所有控件采用VERTICAL(垂直)的方式來布局,如果想要將MD5與后面的文本框放在同一行,那么就需要添加一個水平的boxSizer,然后那將這個水平的boxSizer再放入主的boxSizer
boxSizer = wx.BoxSizer(wx.VERTICAL) #初始化一個垂直的boxSizer,也是整個框架的主Sizer

self.panel = wx.Panel(self) #初始化一個panel,這個panel是放了放之后的控件的

filepath = wx.StaticText(self.panel,-1,"FileDir(請將文件拖到本對話框中)")
filetext = wx.TextCtrl(self.panel,-1,"",size=(350,20))
md5st = wx.StaticText(self.panel,-1,"MD5")
md5tx = wx.TextCtrl(self.panel,-1,size=(250,20))
filesizest = wx.StaticText(self.panel,-1,'FileSize')
filesizetx = wx.TextCtrl(self.panel,-1,size=(250,20))
boxSizer.Add(filepath,0,wx.EXPAND|wx.LEFT|wx.TOP,border=10)
將filepath加入到主的boxSizer中,這里一開始我有一些困惑,一開始我一直以為先將所有的控件放入到panel中,然后再將panel放入到boxSizer中,但是這樣是不對的,而應該是直接就入到boxSizer中,將該控件的父類設置為panel,之后就沒有將panel放入boxSizer這一步操作,wx.LEFT|wx.TOP,border=10 這個參數表示的是該控件距離上來左各有10個像素的距離,再使用wx.EXPAND來使其充分的填充其所在的區域,我曾經想,可否設置成距離上10px,左20px,但是貌似不能這樣設置,Add函數里只能有一個border參數,換句話說只能設置相同的數值,之后我再找找是否可以實現。
boxSizer.Add((-1,20)) #這個是添加一個空距離,距離上20px

dropTarget = FileDropTarget(filetext,md5tx,filesizetx)
self.panel.SetDropTarget( dropTarget )
這個是放該窗口類添加一個拖拽方法,也是比較固定的寫法
上面的class FileDropTarget中的__init__與OnDropFiles方法也是固定的方法,只是里面的處理函數不同。
wxPython中的一些style與flag等參數在布局中使用需要一些經驗,還有它的很多控件和與之綁定的方法,要想熟練掌握還需要下一些工夫,下面兩個網站算是介紹比較詳細,要多多查閱
聲明:本網頁內容旨在傳播知識,若有侵權等問題請及時與本網聯系,我們將在第一時間刪除處理。TEL:177 7030 7066 E-MAIL:11247931@qq.com
Copyright ? 2019-2025 www.alabama37th.com 版權所有
違法及侵權請聯系:TEL:177 7030 7066 E-MAIL:11247931@qq.com 本站由北京市萬商天勤律師事務所王興未律師提供法律服務


